Stainless Steel Undermount Sink Kitchen Sink
A stainless steel undermount sink is a type of kitchen sink that is installed beneath the countertop. This type of sink is popular because it creates a seamless look and is easy to clean. Stainless steel is also a durable material that is resistant to rust and corrosion.
Undermount sinks are more difficult to install than drop-in sinks, but they offer several advantages. First, undermount sinks create a more seamless look because the sink is hidden beneath the countertop. This can give your kitchen a more modern and stylish appearance. Second, undermount sinks are easier to clean because there is no lip around the edge of the sink to trap dirt and debris. Third, undermount sinks are more durable than drop-in sinks because they are supported by the countertop, which helps to prevent them from bending or warping.
If you are considering installing a new kitchen sink, an undermount sink is a great option. Undermount sinks are durable, easy to clean, and create a seamless look. However, it is important to note that undermount sinks are more difficult to install than drop-in sinks. If you are not comfortable installing a sink yourself, you may want to hire a professional to do the job.
Benefits of Stainless Steel Undermount Sinks
There are many benefits to choosing a stainless steel undermount sink for your kitchen. Some of the benefits include:
- Durability: Stainless steel is a very durable material that is resistant to rust and corrosion. This means that your undermount sink will last for many years to come.
- Easy to clean: Stainless steel is also a very easy material to clean. Simply wipe it down with a damp cloth or sponge to remove dirt and debris.
- Seamless look: Undermount sinks create a seamless look because the sink is hidden beneath the countertop. This can give your kitchen a more modern and stylish appearance.
- Increased counter space: Undermount sinks can free up counter space because they are installed beneath the countertop. This can be a great benefit for small kitchens.
Things to Consider Before Installing an Undermount Sink
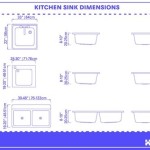
Before you install an undermount sink, there are a few things you should consider. First, you need to make sure that your countertop is thick enough to support the sink. Undermount sinks require a countertop that is at least 1 1/2 inches thick.
Second, you need to make sure that you have the right tools and materials to install the sink. You will need a jigsaw, a drill, a screwdriver, and a sealant. You will also need to purchase a mounting kit for your sink.
Finally, you need to make sure that you have the time and patience to install the sink. Installing an undermount sink can be a challenging project, so it is important to set aside plenty of time to complete the job.
How to Install an Undermount Sink
If you are comfortable installing a sink yourself, here are the steps on how to install an undermount sink:
- Remove the old sink. If you are replacing an old sink, you will need to remove it before you can install the new one. To remove the old sink, turn off the water supply and disconnect the plumbing. Then, use a putty knife to cut the sealant around the sink. Finally, lift the sink out of the countertop.
- Prepare the countertop. Once the old sink is removed, you need to prepare the countertop for the new sink. To do this, clean the countertop and then mark the location of the new sink. You will also need to drill holes for the mounting brackets.
- Install the mounting brackets. The mounting brackets will support the sink from below. To install the mounting brackets, insert the brackets into the holes that you drilled in the countertop. Then, tighten the screws to secure the brackets.
- Apply sealant. Before you install the sink, you need to apply sealant around the edge of the countertop. The sealant will help to prevent water from leaking between the sink and the countertop.
- Install the sink. Once the sealant is applied, you can install the sink. To do this, lift the sink into place and set it on the mounting brackets. Then, tighten the screws to secure the sink.
- Connect the plumbing. Once the sink is installed, you need to connect the plumbing. To do this, attach the water supply lines and the drain line to the sink. Then, turn on the water supply and check for leaks.
Conclusion
Stainless steel undermount sinks are a great way to add style and functionality to your kitchen. These sinks are durable, easy to clean, and create a seamless look. However, it is important to note that undermount sinks are more difficult to install than drop-in sinks. If you are not comfortable installing a sink yourself, you may want to hire a professional to do the job.

Ruvati Undermount Stainless Steel 30 In 16 Gauge Single Bowl Kitchen Sink Rvh7300 The Home

Kraus Standart Pro 30 In Undermount Single Bowl 16 Gauge Stainless Steel Kitchen Sink With Accessories Khu100

Horow Hr S3219d Elaina 32 L X 19 W Single Bowl Stainless Steel Kitchen Sink With Grid And Basket Strainer

Kraus Standart Pro 32 In Undermount Single Bowl 16 Gauge Stainless Steel Kitchen Sink With Accessories Khu100 The Home

Kraus Khu104 33 Undermount 60 40 Double Bowl 16 Gauge Stainless Steel Kitchen Sink

Signature Hardware 448363 Ortega 32 Undermount Single Basin Stainless Steel Kitchen Sink Sinks

Ruvati 32 Inch Workstation Ledge Undermount 16 Gauge Stainless Steel Kitchen Sink Single Bowl Rvh8300 Usa

Kitchen Sinks 32x18 Inch Undermount Sink Stainless Steel 16 Gauge S

Custom Undermount Sink Usa Stainless Havens Luxury Metals

32 Inch Workstation Undermount Kitchen Sink Stainless Steel 18 Gauge Handmade Modern Single Bowl Deep With