Rough Plumbing for Bathroom Sink
Rough plumbing for a bathroom sink is the initial stage of the plumbing installation, which involves setting up the water supply lines, drainpipe, and fixtures before the walls and cabinetry are installed. It's a crucial step that requires proper planning and execution to ensure a functional and leak-free bathroom.
Materials Required:
- Water supply lines (flexible or rigid)
- Drainpipe (usually PVC)
- Drain trap
- Sink drain flange
- Shut-off valves
- Faucet and sink
Step 1: Measure and Mark
Determine the location of the sink and mark the placement of the water supply lines and drainpipe. Ensure there is sufficient space for the sink, faucet, and cabinetry.
Step 2: Cut Pipes
Using a pipe cutter, cut the water supply lines and drainpipe to the desired lengths based on your measurements.
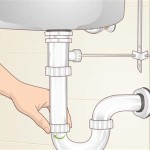
Step 3: Assemble Drain Trap
Assemble the drain trap by connecting a 90-degree elbow to the sink drain flange, then using a straight piece of pipe to connect the elbow to the drainpipe. Secure all connections with glue or pipe dope.
Step 4: Connect Water Supply Lines
Connect the water supply lines to the shut-off valves and extend them to the sink's faucet holes. Use flexible supply lines for easier maneuverability and to reduce strain on the valves.
Step 5: Install Sink Drain Flange
Place the sink drain flange over the drainpipe and secure it with plumbers' putty. Apply a generous amount of putty around the base of the flange to prevent water leakage.
Step 6: Install the Sink
Lift the sink into place and align it with the drain flange and faucet holes. Carefully lower it onto the drain flange and secure it using mounting hardware typically provided with the sink.
Step 7: Connect the Faucet
Insert the faucet into the faucet holes and secure it with locknuts and washers. Connect the faucet's water supply lines to the corresponding lines under the sink.
Step 8: Pressure Test
Turn on the water supply valves and check for any leaks at the connections. Inspect the drain for proper drainage. If no leaks are detected, the rough plumbing for the bathroom sink is complete.
Tips
- Use high-quality materials and follow manufacturer's instructions for proper installation.
- Make sure all connections are tight and secure to prevent future leaks.
- Test the water flow and drainage thoroughly before closing up the walls and cabinets.
- If you encounter any difficulties, do not hesitate to consult with a professional plumber for assistance.

How To Plumb A Bathroom With Multiple Plumbing Diagrams Hammerpedia

A Vessel Sink Conversion Fine Homebuilding

Quick Guide To Bathroom Sink Plumbing Rough In Heights Phyxter Home Services

What Is The Rough In Height For Sink Drains

Basement Remodel Day 2 Plumbing Rough In Detail

How To Plumb A Bathroom With Multiple Plumbing Diagrams Hammerpedia

Plumbing Rough In For Your New Home Builder Tips Quality Armchair Blog Build Renovate Repair Own Save Money As An Owner

Bathroom Plumbing Rough In Dimensions The Home

Double Bathroom Sink Two Diffe Rough Plumbing Drain Methods

Plumbing Rough In Slab Diagrams