Moen Bathroom Sink Stopper Replacement
A malfunctioning bathroom sink stopper can be a minor annoyance that quickly escalates into a frustrating plumbing problem. Fortunately, replacing a Moen bathroom sink stopper is generally a straightforward process that most homeowners can tackle themselves with a few basic tools. This article provides a comprehensive guide to replacing various types of Moen bathroom sink stoppers, empowering homeowners to address this common issue efficiently and effectively.
Identifying Your Moen Sink Stopper Type
Moen utilizes several different stopper designs. Correctly identifying the type installed in your sink is crucial for selecting the appropriate replacement part and employing the correct removal and installation procedures. The most common Moen stopper types include the lift-and-turn, the push-and-seal, and the pop-up stopper.
The lift-and-turn stopper features a knob on top that rotates to seal and open the drain. The push-and-seal stopper operates with a simple push to close and another push to open. The pop-up stopper is connected to a pivot rod mechanism behind the faucet and is operated by a lever on the back of the faucet.
Carefully examine your existing stopper to determine its type. Consulting the original documentation for your Moen faucet or searching online using the model number can provide further clarity if needed. Once the stopper type is identified, acquiring the correct replacement part becomes a simple matter.
Gathering the Necessary Tools and Materials
Preparing the necessary tools beforehand streamlines the replacement process. While specific tools may vary slightly depending on the stopper type, the following are generally required: pliers, a flathead screwdriver, a bucket or container to catch water, and possibly an adjustable wrench. For pop-up stoppers, a flashlight can be helpful for illuminating the under-sink area.
Acquiring the correct replacement stopper is paramount. Moen stoppers are available at most home improvement stores and online retailers. Ensure the replacement stopper is compatible with your Moen faucet model. Purchasing an identical replacement simplifies the installation process and guarantees proper functionality.
Before beginning the replacement process, it is advisable to turn off the water supply to the sink. This precautionary measure prevents accidental water flow during the removal and installation process. Placing a towel or rag underneath the sink can help protect the cabinet from spills or dropped tools.
Replacing a Lift-and-Turn Stopper
Removing a lift-and-turn stopper typically involves unscrewing the knob from the stopper body. This can usually be accomplished by turning the knob counterclockwise. Some models may require holding the stopper body steady from underneath the sink while unscrewing the knob. Once the knob is removed, the stopper body can be lifted out of the drain.
Installing the new lift-and-turn stopper involves inserting the new stopper body into the drain and screwing the new knob onto the stopper body by turning it clockwise. Ensure the stopper rotates smoothly and seals effectively. Test the stopper operation by running water in the sink and observing for any leaks.
Replacing a Push-and-Seal Stopper
Push-and-seal stoppers often feature a retaining nut located underneath the sink. Accessing this nut may require using an adjustable wrench. Loosen the retaining nut and remove the stopper from above the sink. Some models may require removing a clip or pin holding the stopper in place.
Installing the new push-and-seal stopper involves inserting it into the drain opening from above and tightening the retaining nut from underneath. Ensure the stopper sits flush with the sink basin and operates correctly by pushing it to close and open the drain. Check for leaks by running water in the sink.
Replacing a Pop-Up Stopper
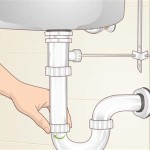
Replacing a pop-up stopper requires accessing the linkage connecting the stopper to the lift rod behind the faucet. This usually involves loosening a setscrew or clip that holds the lift rod to the clevis strap connected to the stopper. Disconnect the lift rod from the clevis strap.
Remove the old pop-up stopper by lifting it out of the drain opening. Install the new pop-up stopper by inserting it into the drain and reconnecting the lift rod to the clevis strap. Tighten the setscrew or clip to secure the connection. Test the operation of the new stopper by using the lift rod lever. Check for leaks by running water in the sink.
By following these steps and taking necessary precautions, replacing a Moen bathroom sink stopper can be a manageable DIY project, eliminating the frustration of a leaky or malfunctioning drain and restoring the full functionality of the sink. Remember to consult your Moen faucet's documentation or contact Moen customer support for specific instructions or assistance related to your particular model.

Moen Replacement Drain Oil Rubbed Bronze Bathroom Sink Stopper In The Drains Stoppers Department At Com

Moen Sink Drains Stoppers At Com

Moen 10709bc Replacement Drain Assembly With Plug And Seat Build Com

Moen Lift N Drain Tub Assembly 101653 The Home

Moen 10790 Lavatory Pop Up Waste Assembly Chrome Faucet Com

Danco 1 In Plastic Pop Up Stopper For Moen Chrome 88994 The Home

Moen Oil Rubbed Bronze Bathroom Sink Drain Kit In The Drains Stoppers Department At Com

Lavatory Drains Moen Solutions

Larsen Bathroom Sink Pop Up Stopper Chrome For Moen 4 7 8 In Long Killingworth True Value

Pacific Plumbing Supply Moen Pivot Rod And Clip Assembly For 10790 99500 Bathroom Sink Drain