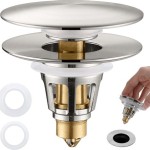
Kitchen Sink Drain Replacement Kit
A kitchen sink drain replacement kit is a set of tools and materials that can be used to replace a worn or damaged kitchen sink drain. These kits typically include a new drain assembly, a set of washers, and a wrench. Some kits may also include a drain plug or stopper.
Replacing a kitchen sink drain is a relatively simple task that can be completed in a few hours. However, it is important to follow the instructions carefully to avoid damaging the sink or drain assembly.
Materials You Will Need:
* Kitchen sink drain replacement kit * Adjustable wrench or pliers * Bucket or container to catch water * Flashlight (optional)Step-by-Step Instructions:
1. Turn off the water supply to the sink: To do this, locate the water shutoff valves beneath the sink and turn them clockwise until the water is off. 2. Place a bucket or container beneath the drain: This will catch any water that may leak out when you remove the old drain. 3. Loosen the slip nut: Using an adjustable wrench or pliers, loosen the slip nut that is located at the bottom of the drain assembly. The slip nut is typically made of plastic or metal and has a hexagonal shape. 4. Remove the old drain assembly: Once the slip nut is loose, you should be able to pull the old drain assembly out of the sink. If the drain is stuck, you may need to use a flashlight to look for any debris or obstructions that may be preventing it from coming out. 5. Inspect the old drain assembly: Once the old drain assembly is removed, inspect it for any damage or wear. If the drain is cracked or broken, it will need to be replaced. 6. Install the new drain assembly: Insert the new drain assembly into the sink. Make sure that the washer is in place on the bottom of the drain assembly. 7. Tighten the slip nut : Hand-tighten the slip nut onto the drain assembly. Then, use an adjustable wrench or pliers to tighten the slip nut further. However, do not overtighten the slip nut, as this could damage the sink or drain assembly. 8. Turn on the water supply and check for leaks: Once the drain is installed, turn on the water supply and check for any leaks. If there are any leaks, tighten the slip nut further.Tips:
* If you are not comfortable replacing the kitchen sink drain yourself, you can hire a plumber to do it for you. * Be sure to clean the sink drain regularly to prevent clogs and other problems. * If you have a garbage disposal, be sure to run it regularly to keep it clean and free of debris.
Kitchen Sink Strainer Assembly Drain Equipment Set Waste Basket Sealing Lid Hose

Keeney Kitchen Sink Installation Kit For 1 2 In Pipe Mk Dblbowlsink At Com

Stainless Steel Drain Assembly Kit Kitchen Sink Strainer For Single Basin

Snappytrap 1 2 In All One Drain Kit For Single Bowl Kitchen Sinks Bar And Utility Dk 100

Sink Drain Kit Parts Repair At Com

Drain Kit For Kitchen Sink Stainless Steel 304 Assembly Waste Strainer Plumbing Fixtures

Bathroom Kitchen Sink Drain Assembly Kit Height Adjustable Slip Type Tube P Trap For G1 1 4inch Universal Fit With Easy

How To Connect A Kitchen Sink Drain

Gold Sink Drain Strainer 3 1 2 Inch Kitchen Assembly Kit Stainless

Plumbcraft Complete Bathroom Drain Repair Kit
See Also