How To Remove Kitchen Sink Faucet
A kitchen sink faucet is an essential part of any kitchen. It is used for washing dishes, filling pots and pans, and rinsing food. Over time, faucets can become worn or damaged and need to be replaced. If you are experiencing problems with your kitchen sink faucet, you may be able to fix it yourself by following these steps. Replacing a kitchen sink faucet is a relatively easy project that can be completed in a few hours.
Before you begin, you will need to gather a few tools and materials.
- Adjustable wrench
- Basin wrench
- Plumber's putty
- New faucet
- Bucket
- Rags
Once you have gathered your tools and materials, you can begin the process of removing your old faucet and installing the new one.
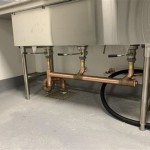
Step 1: Turn off the water supply to the faucet. There will be two shut-off valves under the sink, one for the hot water and one for the cold water. Turn both valves clockwise to turn off the water. If your faucet has a sprayer, you may also need to turn off the water supply to the sprayer.
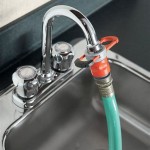
Step 2: Disconnect the water supply lines from the faucet. Use an adjustable wrench to loosen the nuts that connect the water supply lines to the faucet. Be careful not to overtighten the nuts, as this could damage the water supply lines. Once the nuts are loose, you can disconnect the water supply lines from the faucet.
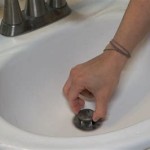
Step 3: Remove the old faucet. Use a basin wrench to loosen the nuts that hold the faucet in place. Be careful not to overtighten the nuts, as this could damage the sink. Once the nuts are loose, you can remove the old faucet from the sink.
Step 4: Clean the sink and faucet mounting surface. Use a damp cloth to clean the sink and faucet mounting surface. This will help to ensure that the new faucet is installed properly.
Step 5: Apply plumber's putty to the base of the new faucet. Plumber's putty is a type of sealant that helps to keep water from leaking around the base of the faucet. Apply a thin bead of plumber's putty to the base of the new faucet.
Step 6: Install the new faucet. Insert the new faucet into the sink and tighten the nuts that hold the faucet in place. Be careful not to overtighten the nuts, as this could damage the sink.
Step 7: Connect the water supply lines to the new faucet. Use an adjustable wrench to tighten the nuts that connect the water supply lines to the new faucet. Be careful not to overtighten the nuts, as this could damage the water supply lines.
Step 8: Turn on the water supply to the faucet. Turn on the shut-off valves under the sink to turn on the water supply to the faucet. Check for leaks around the base of the faucet. If you see any leaks, tighten the nuts that hold the faucet in place.
Step 9: Test the new faucet. Turn on the faucet and check for leaks. If you see any leaks, tighten the nuts that hold the faucet in place.
Once you have completed these steps, your new kitchen sink faucet will be installed and ready to use.

How To Remove A Kitchen Faucet Mounting Nut

How To Replace A Kitchen Sink Faucet

How To Remove A Kitchen Faucet The Home

How To Remove And Install A Kitchen Sink Faucet Moen Georgene 87912srs

How To Replace A Kitchen Faucet Beginner S Guide The Handyman Daughter

Moen Circa 2008 Kitchen Faucet Removal Youtube

How To Replace A Kitchen Faucet Young House Love

How To Replace A Kitchen Faucet Youtube

How To Remove A Kitchen Faucet The Home

How To Remove Kitchen Faucet Easy Simple