How To Remove A Garbage Disposal From A Sink
A garbage disposal is a convenient appliance that can help to keep your kitchen clean and free of food waste. However, there may come a time when you need to remove the garbage disposal from the sink, such as when it needs to be repaired or replaced. Removing a garbage disposal is not a difficult task, but it does require some basic plumbing skills. Follow the steps below to safely and easily remove a garbage disposal from a sink.
Step 1: Safety First
Before you begin, be sure to turn off the power to the garbage disposal at the circuit breaker. This will prevent the disposal from accidentally turning on while you are working on it. You should also shut off the water supply to the sink. Once the power and water are turned off, you can begin the removal process.
Step 2: Disconnect the Plumbing
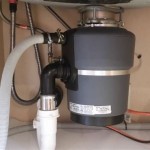
The first step is to disconnect the plumbing from the garbage disposal. Start by disconnecting the drain line. This is the pipe that carries water and waste away from the disposal. Use a wrench to loosen the nuts that hold the drain line in place. Once the drain line is disconnected, you can disconnect the water supply lines. There are typically two water supply lines, one for hot water and one for cold water. Use a wrench to loosen the nuts that hold the water supply lines in place.
Step 3: Remove the Mounting Nuts
Once the plumbing is disconnected, you can remove the mounting nuts that hold the garbage disposal in place. There are typically three or four mounting nuts, located around the flange of the garbage disposal. Use a wrench to loosen the mounting nuts. Once the mounting nuts are loose, you can carefully remove the garbage disposal from the sink.
Step 4: Clean the Sink Flange
Once the garbage disposal is removed, you can clean the sink flange. The sink flange is the part of the sink that the garbage disposal mounts to. Use a sponge or cloth to clean the sink flange of any food waste or debris. You may also want to use a disinfectant to clean the sink flange.
Step 5: Install the New Garbage Disposal
If you are replacing the garbage disposal, you can now install the new garbage disposal. Start by placing the new garbage disposal on the sink flange. Align the mounting holes on the garbage disposal with the mounting holes on the sink flange. Insert the mounting bolts through the mounting holes and tighten the nuts until the garbage disposal is securely fastened to the sink flange.
Step 6: Reconnect the Plumbing
Once the garbage disposal is installed, you can reconnect the plumbing. Start by reconnecting the drain line. Tighten the nuts that hold the drain line in place until it is secure. Next, reconnect the water supply lines. Tighten the nuts that hold the water supply lines in place until they are secure. Turn on the water supply and check for leaks.
Step 7: Test the Garbage Disposal
Once the plumbing is reconnected, you can test the garbage disposal. Turn on the power to the garbage disposal at the circuit breaker. Turn on the water and put some food scraps into the garbage disposal. The garbage disposal should grind up the food scraps and send them down the drain. If the garbage disposal is working properly, you are finished.
Removing a garbage disposal from a sink is not a difficult task, but it does require some basic plumbing skills. By following the steps above, you can safely and easily remove a garbage disposal from a sink.

How To Remove A Garbage Disposal Elimination Or Replacement

Replace A Garbage Disposal With Regular Drain

How To Remove A Garbage Disposal Elimination Or Replacement

How To Replace A Garbage Disposal Family Handyman

How To Replace A Garbage Disposal Family Handyman

How To Remove A Garbage Disposal Youtube

How To Remove A Garbage Disposal Elimination Or Replacement

Diy Tutorial How To Replace A Garbage Disposal The Playbook

How To Remove Old Garbage Disposal And Replumb Back Your Kitchen Drain

How To Replace A Garbage Disposal With Pictures Wikihow