How To Install Kitchen Sink Pipes
Installing kitchen sink pipes can be a straightforward task that requires basic plumbing skills and tools. By following these steps, you can ensure proper installation and avoid any potential leaks or issues with your kitchen sink.
Gather Necessary Materials and Tools
Before you begin, it's crucial to gather all the necessary materials and tools. This will help you work efficiently and avoid delays. Here's what you'll need:
- Kitchen sink pipes (supply lines for hot and cold water)
- Wrench or pliers
- Teflon tape
- Basin wrench
- Bucket or basin
- Putty knife or caulk gun
- Plumber's putty or silicone caulk
Turn Off Water Supply
Safety First: Before starting any plumbing work, ensure you turn off the water supply to your kitchen sink. Locate the shut-off valves, usually underneath the sink, and close them completely.
Disconnect Existing Pipes (If Replacing)
If you are replacing old pipes, disconnect them using a wrench or pliers. Place a bucket or basin underneath the connections to catch any water that may drain out.
Prepare Sink Drain and Faucet
Apply a thin layer of plumber's putty or silicone caulk around the base of the kitchen sink drain. This will create a watertight seal once the drain is tightened in place.
Wrap Teflon tape clockwise around the threads of the faucet's water supply lines. This will help prevent leaks and ensure a secure connection.
Connect Supply Lines to Faucet
Attach the hot and cold water supply lines to the corresponding connections on the faucet. Hand-tighten the connections as much as possible. Use a wrench or pliers to tighten further, but avoid overtightening, as this can damage the connections.
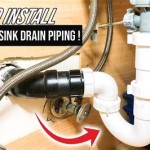
Connect Drain Pipe to Sink
Position the drain pipe over the drain hole in the sink. Apply a bead of plumber's putty or silicone caulk around the base of the drain pipe and tighten the nut that secures it to the sink. Ensure a snug fit to prevent any leaks.
Connect Supply Lines to Shut-Off Valves
Locate the shut-off valves for the hot and cold water supply. Connect the corresponding supply lines to these valves. Again, hand-tighten as much as possible, and then use a wrench or pliers to further tighten the connections.
Turn On Water Supply and Check for Leaks
Once all connections are secure, slowly turn on the water supply at the shut-off valves. Open the faucet and check for any leaks at the connections. Tighten any loose connections as needed.
If everything is installed correctly, you should have successfully installed your kitchen sink pipes. Enjoy the satisfaction of a leak-free and properly functioning kitchen sink.

How To Install A Kitchen Sink Drain

How To Install Kitchen Sink Drain For Beginners

How To Install A Kitchen Sink Drain Diy Guide For You

How To Install The Kitchen Sink Drain Pipes

How To Connect A Kitchen Sink Drain

Kitchen Sink Plumbing How To Make A Drain Better

How To Install Drain Pipes On A Kitchen Sink

How To Install A Kitchen Sink Drain

How To Replace A Kitchen Sink Basket Strainer Diy Family Handyman

How To Install A Kitchen Sink Drain