How To Fix a Leaking Sink Faucet
A dripping faucet is not only annoying but also wasteful. Fortunately, most leaks are relatively easy to repair with basic tools and a little plumbing know-how. This guide outlines the steps to diagnose and fix common sink faucet leaks.
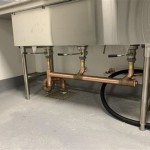
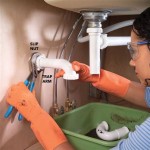
Preparation is Key: Before starting any repair, turn off the water supply to the faucet. This is typically done by locating the shut-off valves under the sink. Turn both the hot and cold water valves clockwise until they stop. Turn on the faucet to ensure the water flow has ceased and to relieve any remaining pressure in the lines. Place a towel or drain stopper in the sink basin to catch any dropped parts and prevent them from going down the drain.
Identifying the Leak Source: Pinpointing the leak's origin is the first step towards a successful repair. Is the water dripping from the spout, the base of the faucet, or the handles? A leak from the spout often indicates a problem with the O-rings or cartridge inside the faucet body. A leak at the base typically points to a problem with the O-rings or seals connecting the faucet to the sink. Leaks around the handles usually involve worn-out O-rings or packing nuts.
Gathering Necessary Tools: Having the right tools simplifies the repair process. Common tools needed include a basin wrench, adjustable wrench, Phillips and flathead screwdrivers, pliers, and possibly a cartridge puller. Replacement parts, such as O-rings, cartridges, and valve seats, will be necessary and can be purchased at most hardware stores. When purchasing replacement parts, take the old part with you to ensure a perfect match.
Repairing a Compression Faucet: Compression faucets have separate hot and cold water handles. To repair a leak in a compression faucet, first, remove the handle screws, typically located under decorative caps. Then, use a wrench to remove the packing nut and stem. Examine the O-rings and washer at the bottom of the stem for wear and tear. Replace these parts with new ones, reassemble the stem and packing nut, and finally, replace the handle.
Repairing a Ball Faucet: Ball faucets have a single handle that controls both water temperature and flow. To repair a ball faucet, first, remove the handle screw and handle. Then, remove the adjusting ring and cap. Carefully lift out the ball and examine it for wear or mineral deposits. Clean or replace the ball as needed. Inspect and replace the O-rings and springs located within the faucet body. Reassemble the faucet in reverse order.
Repairing a Cartridge Faucet: Cartridge faucets, like ball faucets, have a single handle. To repair a cartridge faucet, remove the handle screw and handle. Use a cartridge puller tool if necessary to remove the cartridge. Inspect the O-rings at the base of the cartridge and replace them if worn. Insert the new cartridge, ensuring it's properly aligned, and reassemble the handle.
Repairing a Ceramic Disc Faucet: Ceramic disc faucets are known for their durability and are typically the easiest to repair. Leaks in these faucets often originate from worn-out O-rings within the cartridge. Disassemble the faucet handle similarly to a cartridge faucet, access the disc cylinder, and replace any worn O-rings or seals. Reassemble the faucet, ensuring all parts are correctly aligned.
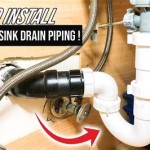
Addressing Leaks at the Base: Leaks at the base of the faucet often indicate a problem with the mounting nuts or the O-rings that seal the faucet to the sink. Tighten the mounting nuts using a basin wrench. If the leak persists, disconnect the water supply lines and remove the faucet. Replace the O-rings and re-install the faucet, ensuring all connections are secure.
Dealing with Stubborn Leaks: If the leak persists after attempting these repairs, it might be time to consult a professional plumber. Certain issues, like corroded valve seats or damaged faucet bodies, may require specialized tools or expertise to address effectively. A professional plumber can accurately diagnose the problem and recommend the appropriate course of action, which may include replacing the entire faucet.
Preventing Future Leaks: Regular maintenance can help prevent future faucet leaks. Periodically inspect the faucet for any signs of wear and tear. Avoid using excessive force when operating the handles. Consider installing a water softener to reduce mineral buildup, which can contribute to wear and tear on internal components. By proactively addressing potential issues, one can extend the lifespan of their faucet and avoid costly repairs.

Properly Fixing A Leaky Sink Faucet Wallside Windows

How To Fix A Dripping Or Leaky Double Handle Faucet

How To Fix A Leaky Faucet Guides For Every Design And Style

How To Fix A Leaky Faucet The Home

Part 1 Of 2 How To Fix A Dripping Faucet

How To Fix A Bathroom Faucet 14 Steps

How To Fix A Sink Sprayer Leaking In The Kitchen Full Guide

12 Ways To Stop A Leaking Faucet Beyond Wow Plumbing

5 Reasons Your Faucet Is Dripping Water How To Fix It

How To Fix A Leaky Faucet The Home