How to Fix a Leaking Sink Drain
A leaking sink drain can be a source of annoyance and frustration. Not only can it lead to water damage and mold growth, but it can also be a sign of a more serious plumbing issue. Fortunately, most leaking sink drains can be fixed with a few simple tools and techniques. This article will guide you through the most common causes of leaking sink drains and provide step-by-step instructions on how to fix them.
Identify the Source of the Leak
The first step in fixing a leaking sink drain is to identify the source of the leak. There are several common causes, each requiring a different approach to repair.
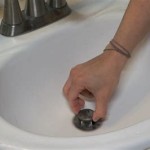
1. Loose or Damaged Drain Nut: This is the most common cause of leaks in sink drains. The drain nut, located underneath the sink, secures the drain assembly to the sink itself. If the nut is loose or damaged, it can allow water to leak out. 2. Worn-out Washer: The washer, a small rubber ring, sits between the drain stopper and the drain assembly. If the washer is worn out or damaged, it will not properly seal the drain, leading to leaks. 3. Cracked or Broken Drain Pipe: While less common, cracks or breaks in the drain pipe can also cause leaks. These usually occur due to age, corrosion, or physical damage. 4. Leaky Drain Trap: The drain trap is a curved pipe underneath the sink that prevents sewer gases from entering your home. If the trap is cracked or leaking, it can cause a leak.
Repairing a Loose or Damaged Drain Nut
If the leak is caused by a loose or damaged drain nut, the repair is relatively simple.
1. Gather Supplies: You will need a wrench or pliers that fit the size of the drain nut, a new drain nut if needed, and a plumber’s putty or Teflon tape. 2. Turn Off the Water: Locate the shut-off valve for the sink and turn it off. 3. Remove the Drain Assembly: Use the wrench or pliers to loosen and remove the drain nut. 4. Inspect the Drain Nut: If the drain nut is damaged, replace it with a new one. If it is just loose, tighten it securely. 5. Apply Sealant: Apply a thin layer of plumber’s putty or a few wraps of Teflon tape to the threads of the new drain nut. 6. Reassemble the Drain: Thread the drain assembly back into place and tighten the drain nut securely. 7. Turn On the Water: Turn the water back on and check for leaks.
Replacing a Worn-out Washer
A worn-out washer can cause a leak around the drain stopper. Replacing it is a simple process.
1. Gather Supplies: You will need a new washer, a flat-head screwdriver, and a pair of pliers. 2. Remove the Drain Stopper: If your drain stopper is a lift-type, simply lift it out. For a push/pull stopper, use a flat-head screwdriver to pry the stopper up and out. 3. Remove Old Washer: Use pliers to carefully remove the old washer from the stopper. 4. Install New Washer: Insert the new washer onto the drain stopper, ensuring it sits properly. 5. Reinstall Drain Stopper: Replace the drain stopper and test for leaks by turning the water on and off.
Addressing a Cracked or Broken Drain Pipe
A cracked or broken drain pipe requires a more involved repair.
1. Access the Drain Pipe: You may need to remove cabinets or other obstructions to access the damaged pipe. 2. Cut Out the Damaged Section: Use a pipe cutter or hacksaw to cut out the cracked or broken section. 3. Insert a Coupling: Install a pipe coupling on each end of the cut pipe. 4. Connect the Replacement Pipe: Insert a piece of new drain pipe into the couplings and tighten securely. 5. Seal and Test: Apply plumber’s putty or Teflon tape to the joints and then test for leaks.
Repairing a Leaky Drain Trap
A leaking drain trap usually requires replacement.
1. Gather Supplies: You will need a new drain trap, a wrench or pliers, and plumber’s putty or Teflon tape. 2. Turn Off the Water: Shut off the water supply to the sink. 3. Disconnect the Drain Trap: Use a wrench or pliers to loosen and remove the nuts connecting the drain trap to the drain pipe. 4. Remove the Drain Trap: Carefully remove the old drain trap. 5. Install the New Drain Trap: Connect the new drain trap to the drain pipe, using plumber’s putty or Teflon tape to seal the joints. 6. Connect the Drain Lines: Reconnect the drain lines to the drain trap. 7. Turn On the Water: Turn the water back on and check for leaks.
If you are unsure about any of these steps or if the leak persists after attempting these repairs, it is best to contact a licensed plumber for assistance.

4 Simple Ways To Fix A Leaky Sink Drain Pipe Wikihow

Leaky Sink Basket Strainer How To Fix The Most Common Leak

How To Fix Or Replace A Leaky Sink Trap Hometips

4 Simple Ways To Fix A Leaky Sink Drain Pipe Wikihow

How To Replace A Kitchen Sink Drain Strainer Repair Leak

How To Repair A Leaking Sink Trap

Quick Tip For A Kitchen Sink Drain That Is Leaking

4 Ways To Fix A Bathroom Sink Leaking Underneath 1 Tom Plumber

Leak How To Fix Leaking Bathroom Sink Drain Where Pvc Meets Abs Connection Home Improvement Stack Exchange

Easy Ways To Fix A Leaky Sink Trap 12 Steps With Pictures