How To Change The Bathroom Sink
Replacing a bathroom sink is a relatively simple plumbing project that can be completed in a few hours with the right tools and materials. Here is a step-by-step guide on how to change a bathroom sink:
Step 1: Gather the necessary tools and materials
Before you start, you will need to gather the following tools and materials:
- Adjustable wrench
- Plumber's putty
- New bathroom sink
- New faucet (if desired)
- Caulk gun
- Caulk
Step 2: Turn off the water supply
The first step is to turn off the water supply to the sink. There should be two shut-off valves under the sink, one for the hot water and one for the cold water. Turn both valves clockwise until they are fully closed.
Step 3: Disconnect the water supply lines
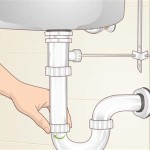
Once the water supply is turned off, you can disconnect the water supply lines from the faucet. Use an adjustable wrench to loosen the nuts that hold the water supply lines to the faucet. Once the nuts are loose, you can unscrew the water supply lines by hand.
Step 4: Remove the old sink
Once the water supply lines are disconnected, you can remove the old sink. First, remove the nuts that hold the sink to the countertop. Once the nuts are removed, you can lift the sink straight up and off the countertop.
Step 5: Clean the countertop
Once the old sink is removed, you can clean the countertop. Use a damp cloth to wipe away any dirt or debris. You can also use a mild cleaner to clean the countertop if necessary.
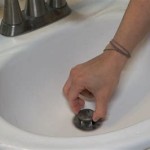
Step 6: Apply plumber's putty
Before you install the new sink, you need to apply plumber's putty to the bottom of the sink. Plumber's putty is a type of sealant that helps to create a watertight seal between the sink and the countertop. To apply plumber's putty, roll it into a rope and then place it around the bottom edge of the sink. Make sure to press the plumber's putty into place so that it creates a seal.
Step 7: Install the new sink
Once the plumber's putty is in place, you can install the new sink. Place the sink on the countertop and then align the holes in the sink with the holes in the countertop. Once the sink is aligned, you can tighten the nuts that hold the sink to the countertop. Make sure to tighten the nuts securely, but do not overtighten them.
Step 8: Connect the water supply lines
Once the sink is installed, you can connect the water supply lines. To do this, screw the water supply lines into the faucet. Make sure to tighten the nuts securely, but do not overtighten them.
Step 9: Turn on the water supply
Once the water supply lines are connected, you can turn on the water supply. Slowly turn on the shut-off valves under the sink until the water starts to flow through the faucet. Check for leaks around the sink and faucet.
Step 10: Caulk around the sink
Once the water supply is turned on and there are no leaks, you can caulk around the sink. To do this, apply a bead of caulk around the edge of the sink where it meets the countertop. Use your finger or a caulk tool to smooth out the caulk. Make sure to wipe away any excess caulk.
Step 11: Clean up
Once the caulk is dry, you can clean up. Wipe away any remaining caulk or debris from the sink and countertop. You can also use a damp cloth to clean the faucet.
Replacing a bathroom sink is a relatively simple plumbing project that can be completed in a few hours with the right tools and materials. By following these steps, you can easily change the bathroom sink in your home.

How To Replace A Bathroom Faucet Tinged Blue

Replace Vanity Top And Faucet Diy Network Youtube

How To Install A Bathroom Sink Youtube

Here S How Install A Bathroom Pedestal Sink

Diy How To Replace A Bathroom Sink Faucet Remove Install Youtube

Bathroom Sink Plumbing Installation Youtube

How To Update Change A Bathroom Faucet Happiness Is Homemade

How To Replace A Bathroom Sink Youtube

How To Easily Replace Basin Taps Step By

How To Replace A Bathroom Faucet Tinged Blue