Hooking Up A Kitchen Sink Drain
The kitchen sink is one of the most used appliances in the home, and it's important to make sure that it's properly installed and hooked up. A loose or leaky sink can cause water damage to your cabinets and flooring, so it's important to get it right the first time.
Materials you'll need:
- Pliers
- Adjustable wrench
- Putty knife
- Plumber's putty
- Teflon tape
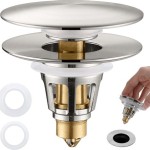
- New sink drain and tailpiece
Step-by-step instructions:
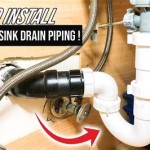
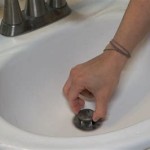
1. Turn off the water supply. The first step is to turn off the water supply to your sink. There should be two shut-off valves under the sink, one for the hot water and one for the cold water. Turn both valves clockwise to turn off the water. 2. Disconnect the old drain. Once the water is turned off, you can disconnect the old drain. Use a pair of pliers to loosen the nuts that hold the drain in place. Once the nuts are loose, you can pull the drain out of the sink. 3. Clean the drain hole. Once the old drain is removed, you need to clean the drain hole. Use a putty knife to scrape away any old plumber's putty or debris. 4. Apply plumber's putty. Apply a bead of plumber's putty around the edge of the new drain. The plumber's putty will help to create a watertight seal between the drain and the sink. 5. Insert the new drain. Insert the new drain into the sink hole. Make sure that the putty is evenly distributed around the edge of the drain. 6. Tighten the nuts. Tighten the nuts that hold the drain in place. Use an adjustable wrench to tighten the nuts until they are snug. Do not overtighten the nuts, as this can damage the sink or the drain. 7. Install the tailpiece. The tailpiece is the pipe that connects the drain to the P-trap. Screw the tailpiece onto the drain. Tighten the tailpiece until it is snug. 8. Turn on the water supply. Once the drain is installed, you can turn on the water supply. Check for leaks around the drain and the tailpiece. If you see any leaks, tighten the nuts or the tailpiece until the leaks stop.Tips:
- Use Teflon tape on the threads of the tailpiece to help create a watertight seal.
- If you are having trouble getting the drain to fit snugly in the sink hole, you can use a rubber washer to create a better seal.
- If you are replacing a garbage disposal, you will need to connect the tailpiece to the disposal outlet. Follow the manufacturer's instructions for connecting the tailpiece to the disposal.

How To Install A Kitchen Sink Drain

How To Install Kitchen Sink Drain Strainer Stop Leaks

How To Install A Kitchen Sink Drain Diy Guide For You

How To Install A Kitchen Sink Drain

Kitchen Sink Plumbing How To Make A Drain Better

How To Install A Kitchen Sink Drain With Pictures Wikihow

How To Connect A Kitchen Sink Drain

How To Replace A Kitchen Sink Basket Strainer Diy Family Handyman

How To Install A Kitchen Sink Drain With Pictures Wikihow

How To Connect A Kitchen Sink Drain 2024