Brita Under Sink Water Filter Replacement
Maintaining clean, great-tasting drinking water at home is a priority for many. Under-sink filtration systems, like those offered by Brita, provide a convenient solution. However, ensuring optimal performance requires regular filter replacements. This article will explore the importance of timely Brita under-sink water filter replacements and guide users through the process.
Brita under-sink water filters utilize a filtration process that typically involves activated carbon. This process effectively reduces sediment, chlorine taste and odor, and other impurities commonly found in tap water. However, the filter's capacity to perform these functions diminishes over time. The activated carbon within the filter becomes saturated with the very substances it is designed to remove. This saturation reduces the filter's effectiveness, potentially allowing contaminants to pass through into the drinking water.
Replacing the filter cartridge at the recommended intervals is essential to maintain the filter's intended performance. Brita generally recommends replacing the standard under-sink filter every six months. This timeframe ensures optimal contaminant reduction and maintains the desired water quality. Ignoring this recommendation may lead to reduced water flow, diminished contaminant removal, and potentially unpleasant tastes and odors in the filtered water.
Determining the appropriate replacement time can be accomplished in a few ways. Consulting the documentation that came with the Brita under-sink system will provide specific guidance for the installed filter model. Many Brita systems also include a sticker reminder on the filter housing or faucet, indicating the installation date and providing a visual cue for the next replacement. Additionally, some models feature electronic indicators that signal when the filter's lifespan has expired.
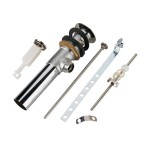
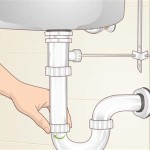
The Brita under-sink filter replacement process is generally straightforward and can be completed by most homeowners with minimal tools. Typically, the process begins by locating the shut-off valves for the cold water supply line connected to the filtration system. Turning these valves off prevents water flow during the cartridge replacement. Next, the filter housing is opened, typically by twisting or depressing a release mechanism, allowing access to the old filter cartridge.
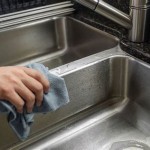
The old filter cartridge should be removed and properly disposed of. Inspect the filter housing for any debris or sediment and clean it if necessary. The new Brita filter cartridge is then carefully aligned and inserted into the housing, ensuring a proper seal. The housing is then closed and secured according to the manufacturer's instructions.
After securing the filter housing, the cold water supply valves should be slowly turned back on, allowing water to flow through the new filter. Observing the system for any leaks around the filter housing is crucial. If leaks are detected, the housing should be rechecked to ensure the filter is correctly installed and the housing is properly sealed. Brita recommends flushing the new filter for approximately five minutes by running cold water from the dedicated faucet connected to the system. This flushing process removes any residual carbon fines or air from the new filter, ensuring clean and fresh-tasting water from the first use.
Several Brita under-sink filter models are available, each designed to address specific water quality concerns. Some filters focus on reducing chlorine taste and odor, while others offer enhanced sediment filtration or even lead reduction. Selecting the correct replacement filter ensures the system continues to provide the desired water quality. Consulting the original system documentation or the Brita website can help identify the appropriate replacement cartridge for a specific model.
Beyond the standard six-month replacement schedule, certain factors can influence filter lifespan and necessitate more frequent changes. Households with particularly hard water or high sediment levels may find their filters clogging more quickly. Similarly, increased water usage can also shorten filter lifespan. Monitoring water quality and flow rate can help determine whether a filter needs replacing sooner than the standard six-month interval.
Regular replacement of the Brita under-sink water filter is a vital aspect of maintaining a clean and efficient filtration system. Adhering to the recommended replacement schedule ensures optimal performance, providing consistently clean, great-tasting water for household consumption. Understanding the replacement process and selecting the correct replacement cartridge contribute significantly to a positive user experience and the long-term effectiveness of the Brita under-sink water filtration system.
Proper disposal of used water filter cartridges is also important. Check local regulations for guidance on proper disposal. Some areas may have specific recycling programs for water filters, while others may require disposal with regular household waste.
By following these guidelines, homeowners can maximize the benefits of their Brita under-sink water filtration system and enjoy clean, filtered water for years to come.

Brita Water Filter Replacement Cartridges Replace P1000 Budget Alternative Uk Filters

Under Sink Reverse Osmosis System Brita Pro

Brita Redi Twist Under Sink Replacement Filter Wfusf201

Brita Water Filter Replacement Cartridges Replace Inline A1000 P1000 Uk Filters

Brita Redi Twist Under Sink Replacement Filter Wfusf203 The Home

Brita Mypure A1c Undersink Water Filter Kit

Brita Mypure Slim V Mf Water Filter System

Brita Redi Twist Reverse Osmosis Replacement Filter Set Wfusfs2332 The Home

Brita Redi Twist Under Sink Replacement Filter Wfusf202 The Home

Brita Water Filter Replacement Cartridges Replace A1000 Alternative Uk Filters