Replacing an Undermount Sink with Granite Countertops
Replacing an undermount sink, particularly with the added complexity of granite countertops, presents a substantial home improvement project. This undertaking requires careful planning, specialized tools, and a precise execution to avoid damaging the expensive countertop material. Understanding the process thoroughly beforehand is crucial for a successful outcome.
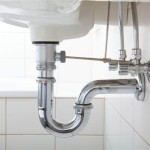
The first step involves disconnecting the existing plumbing. This includes shutting off the water supply valves for both hot and cold water. After confirming the water is off, disconnect the supply lines from the shut-off valves and the faucet tailpieces connected to the sink drain. Also, disconnect the P-trap assembly and the drainpipe connected to the sink drain flange. It's advisable to have a bucket handy to catch any residual water in the pipes.
Next, the sink needs to be detached from the granite countertop. Undermount sinks are typically secured with epoxy and clips from underneath. Accessing these clips often requires cutting through a small access panel in the cabinet below the sink. Once accessed, the clips can be carefully released. A putty knife or a thin blade is then used to carefully break the epoxy seal between the sink and the countertop. This process requires patience and precision to prevent chipping or cracking the granite. Supporting the sink from below while breaking the seal is highly recommended to prevent it from falling once detached.
Once the sink is free, clean the countertop surface thoroughly. Remove any residual epoxy or sealant. This ensures proper adhesion of the new sink. Inspect the countertop for any damage that might have occurred during the removal process. Minor chips can often be repaired with a granite repair kit.
Choosing the right replacement sink is a critical step. Consider the size and configuration of the existing cutout in the granite. While some modifications can be made, significant alterations to the cutout are challenging and risky with granite. Stainless steel, cast iron, and composite materials are popular choices for undermount sinks, each offering different advantages in terms of durability, noise reduction, and aesthetics.
Before installing the new sink, a test fit is highly recommended. Place the new sink in the cutout to ensure a proper fit and identify any potential issues. This allows for adjustments before applying any sealant. Mark the location of the sink clips and faucet holes on the underside of the countertop for easier installation.
The actual installation of the new sink begins by applying a bead of silicone sealant around the perimeter of the cutout. This creates a watertight seal between the sink and the countertop. The sink is then carefully lowered into the cutout and pressed firmly against the countertop. Secure the sink clips from below, ensuring they are tightened evenly to distribute the pressure and prevent cracking the granite.
Connecting the plumbing is the next stage. Attach the faucet tailpieces to the new sink's drain flange, followed by connecting the P-trap assembly and the drainpipe. Connect the water supply lines to the faucet tailpieces and the shut-off valves. Turn the water supply back on slowly to check for any leaks. Address any leaks immediately to prevent water damage.
Finishing touches include sealing the gap between the sink and the countertop with a bead of silicone caulk. This provides an additional barrier against water infiltration and enhances the aesthetic appearance. Clean any excess silicone sealant with a damp cloth for a professional finish.
While this process outlines the general steps involved, variations may exist depending on the specific sink and countertop configuration. Consulting a professional plumber or countertop installer is always advisable, particularly for individuals with limited DIY experience. Working with granite requires specific knowledge and tools, and errors can lead to costly repairs. Professional installation provides assurance of proper sealing and secure fastening, minimizing the risk of future issues.
Selecting the appropriate sealant for granite is crucial for achieving a long-lasting, watertight seal. Specific silicone sealants are designed for natural stone applications, offering superior adhesion and resistance to mold and mildew. These sealants are typically available in a range of colors to match the granite countertop. Using the wrong type of sealant can lead to staining or discoloration of the granite.
The tools required for this project include basic plumbing tools like adjustable wrenches and pliers, as well as specialized tools for working with granite. A putty knife, a utility knife with a sharp blade, safety glasses, and work gloves are essential. A drill might be needed to create or enlarge the access panel in the cabinet. Having the right tools on hand ensures a smoother and more efficient installation process.
Properly supporting the granite countertop during the sink removal and installation is paramount. Granite, while durable, is susceptible to cracking under stress. Using temporary supports beneath the countertop helps distribute the weight and prevent damage. These supports can be removed once the new sink is securely in place.

How To Replace And Install An Undermount Sink

How To Install An Undermount Kitchen Sink On A Granite Countertop Youtube

How To Install An Undermount Sink In Granite Mounting 7 Steps

Replacing 60 40 Undermount Sink

Undermount Sink Install Granite Countertop Diy Episode 11 Youtube

How To Replace And Install An Undermount Kitchen Sink House By The Preserve

Diy Easy Undermount Sink Install

How To Install An Undermount Sink A Granite Countertop Selection

How To Fix Fallen Undermount Sink Under Granite Countertop Diy 2024

How Do You Install Undermount Sinks Marble Com