How to Remove a Drain Stopper From a Sink
Removing a drain stopper can seem like a daunting task, but with the right tools and techniques, it can be accomplished efficiently. Several different types of drain stoppers exist, each requiring a specific removal method. Understanding the type of stopper in your sink is the first step towards successful removal.
Identifying Your Drain Stopper
Correctly identifying the type of drain stopper is crucial for choosing the appropriate removal method. Misidentification can lead to unnecessary complications or even damage to the sink. Common types include:
1. Push-and-seal stopper: This type of stopper is operated by pressing down to seal and pressing again to open. It's typically recognizable by its visible cap or flange around the top.
2. Lift-and-turn stopper: This stopper is removed by lifting and turning it counterclockwise. A small knob or nut is usually visible on the top.
3. Toe-touch stopper: Operated by a lever located at the back of the drainpipe, this stopper is often hidden from view. Pressing the toe-touch lever raises and lowers the stopper.
4. Pop-up stopper: Connected to a pivot rod mechanism located under the sink, this stopper pops up and down when the lift rod behind the faucet is operated.
5. Screw-in stopper: This less common stopper screws directly into the drain opening and is easily removed by twisting it counterclockwise.
Removing a Push-and-Seal Stopper
Push-and-seal stoppers are generally straightforward to remove. The key is to understand the locking mechanism holding the stopper in place. Here’s a step-by-step guide:
1. Locate the locking nut: Look underneath the sink for a nut securing the stopper pivot rod. This nut may require pliers or a wrench to loosen.
2. Loosen the nut: Carefully loosen and remove the nut. The stopper should now be easily removable from above the sink.
3. Pull out the stopper: Grasp the stopper firmly and pull it straight up and out of the drain opening.
Removing a Lift-and-Turn Stopper
Removing a lift-and-turn stopper involves a simple twisting motion. The procedure is as follows:
1. Lift the stopper: Lift the stopper to its highest position.
2. Turn the stopper: Turn the stopper counterclockwise. You may feel some resistance. Continue turning until the stopper releases.
3. Remove the stopper: Lift the stopper straight out of the drain opening.
Removing a Toe-Touch Stopper
Toe-touch stoppers require access to the linkage under the sink. Removal involves detaching the stopper from the operating lever.
1. Locate the clevis strap: Under the sink, find the clevis strap connecting the stopper linkage to the toe-touch lever.
2. Detach the clevis strap: Carefully disconnect the clevis strap from the lever. This may involve pressing a small clip or removing a retaining screw.
3. Remove the stopper: The stopper should now be free to be removed from above the drain opening.
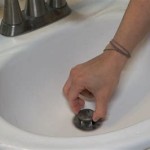
Removing a Pop-Up Stopper
Pop-up stoppers are connected to a pivot rod and require access to the underside of the sink. Follow these steps for removal:
1. Locate the pivot rod: Look under the sink for a horizontal rod connected to the drainpipe. This is the pivot rod.
2. Detach the pivot rod: The pivot rod usually connects to the drainpipe with a nut or clip. Disconnect this connection.
3. Remove the stopper: With the pivot rod detached, the stopper can be removed from above the sink.
Removing a Screw-In Stopper
Screw-in stoppers are the easiest type to remove. They simply unscrew from the drain opening.
1. Grip the stopper: Firmly grasp the stopper.
2. Turn counterclockwise: Turn the stopper counterclockwise until it is completely unscrewed.
3. Remove the stopper: Lift the stopper out of the drain opening.
Troubleshooting
If you encounter difficulty removing your drain stopper, examine the following:
1. Mineral buildup: Mineral deposits can cause the stopper to stick. Soaking the stopper in vinegar can help loosen these deposits.
2. Corrosion: Corrosion can also make removal difficult. Penetrating oil can help to free a corroded stopper.
3. Damaged components: Check for any damaged parts in the drain assembly, such as a bent pivot rod or a broken clevis strap. These may need to be replaced.
By correctly identifying the type of drain stopper and following the appropriate removal procedures, the task of removing a drain stopper can be accomplished effectively and without difficulty.

How To Remove A Sink Stopper The Home

Need To Remove A Bathroom Sink Stopper It S So Easy

How To Remove A Stopper From The Bathroom Sink Family Handyman

Bathroom Sink Drain Stopper Not Working

How To Remove A Sink Stopper The Home

How To Replace A Sink Stopper Quick And Simple Home Repair

How To Remove A Bathroom Sink Pop Up Stopper

How To Remove A Sink Pop Up Stopper

Need To Remove A Bathroom Sink Stopper It S So Easy

How To Remove Drain Plug From Sink Youtube