How To Connect a Sink To a Drain Pipe
Connecting a sink to a drain pipe is a fundamental plumbing task. Whether installing a new sink or replacing an old one, understanding the process is crucial for a leak-free and functional sink. This guide provides a comprehensive overview of the steps involved in connecting a sink to a drain pipe.
Essential Tools and Materials: Before beginning, gather the necessary tools and materials. These typically include a basin wrench, plumber's putty, slip-nut pliers, a P-trap assembly, tailpiece extension, drain flange, rubber washers, and Teflon tape. A bucket and rags are also recommended for managing spills and cleanup.
Preparing the Sink Drain: The first step involves preparing the sink drain. If replacing an existing sink, the old drain assembly must be removed. This often requires loosening the slip nuts connecting the P-trap to the drainpipe and the tailpiece to the sink drain. Once removed, thoroughly clean the sink drain opening to ensure a proper seal for the new drain assembly.
Installing the Drain Flange: The drain flange is the component that connects the sink drain to the drainpipe. A bead of plumber's putty is applied around the underside of the drain flange. The flange is then inserted into the sink drain opening and pressed firmly into place. From below the sink, the locknut and rubber washer are tightened onto the drain flange, securing it to the sink. Excess putty should be cleaned away.
Connecting the Tailpiece: The tailpiece is the pipe that extends from the sink drain to the P-trap. A rubber washer and nut are placed onto the tailpiece. The tailpiece is then inserted into the drain flange from above and tightened with the nut. If necessary, a tailpiece extension can be used to ensure the tailpiece reaches the P-trap inlet.
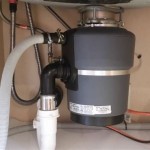
Assembling the P-Trap: The P-trap serves an essential function by trapping water, preventing sewer gases from entering the home. The P-trap assembly typically consists of two slip nuts, two rubber washers, a trap arm, and the trap bend. The slip nuts and washers are placed onto the trap arm and trap bend. The trap arm is then connected to the drainpipe extending from the wall, and the trap bend is connected to the tailpiece. The slip nuts are hand-tightened, then further tightened with slip-nut pliers, ensuring a secure connection.
Testing the Connection: Once the connections are made, it is crucial to test for leaks. Fill the sink with water and then let it drain. Carefully inspect all connections for any signs of dripping or leakage. If leaks are detected, tighten the connections further. If the leaks persist, disassemble the connections, check the washers, and reassemble, ensuring proper alignment and tightening.
Variations in Drain Configurations: While the basic principles remain consistent, variations can occur in drain configurations. Some sinks may have two drain openings, requiring a double-bowl sink drain assembly. Furthermore, the drain pipe configuration within the wall might necessitate adjustments in the P-trap assembly and tailpiece length.
Maintaining Drain System Functionality: Regular maintenance can prevent clogs and maintain proper drain system functionality. Avoid pouring grease or oil down the drain. Periodically flush the drain with hot water to help clear any minor buildup. If a clog occurs, a plunger or drain snake can be used to dislodge the obstruction. However, for persistent clogs, it is advisable to consult a professional plumber.
Safety Precautions: When working under a sink, it's essential to take safety precautions. Turn off the water supply lines to the sink before starting any work. Wear appropriate safety glasses to protect eyes from debris or splashing water. If working with chemical drain cleaners, carefully follow the manufacturer's instructions and ensure adequate ventilation.
Understanding Local Plumbing Codes: Before undertaking any plumbing project, familiarize yourself with local plumbing codes. Codes may dictate specific requirements for pipe materials, trap configurations, and venting. Compliance with local codes ensures the safety and legality of the plumbing installation.
Seeking Professional Assistance: While connecting a sink to a drain pipe is often manageable as a DIY project, complex situations may require the expertise of a licensed plumber. If unsure about any aspect of the process, or if encountering difficulties, seeking professional assistance is always the best course of action to ensure a correctly and safely installed plumbing system.
Proper Disposal of Old Plumbing Components: When replacing old plumbing components, dispose of them responsibly. Check local regulations for proper disposal guidelines. Some materials, such as metal pipes and fittings, may be recyclable. Proper disposal helps protect the environment and prevents potential hazards.

How To Easily Connect The Plumbing For A New Bathroom Sink Hometips

How To Install A Kitchen Sink Drain

How To Connect A Bathroom Sink Drain

How To Plumb A Drain Sink Pipes

How To Install A Pipe From Sink Drain Wall Ehow

Kitchen Sink Plumbing How To Make A Drain Better

How To Install Bathroom Sink Drain Queen Bee Of Honey Dos

How To Install A Kitchen Sink Drain Diy Guide For You

How To Install P Trap And Bathroom Sink Drain Piping Easy Installation For Beginners Youtube

How To Install A Kitchen Sink Drain With Pictures Wikihow