Replacing a Kitchen Sink Sprayer
A malfunctioning kitchen sink sprayer can be a significant inconvenience. Whether it's leaking, clogged, or has low water pressure, replacing the sprayer is often a simple and cost-effective solution. This article provides a comprehensive guide to replacing a kitchen sink sprayer, empowering homeowners to tackle this task themselves.
Identifying the Type of Sprayer
Before beginning the replacement process, it is essential to identify the type of sprayer currently installed. This will ensure the purchase of a compatible replacement. The most common types include:
- Pull-down sprayer: Integrated into the faucet and pulls down from the spout.
- Pull-out sprayer: Similar to pull-down, but pulls out horizontally.
- Side sprayer: Mounted separately on the sink deck.
Gathering Necessary Tools and Materials
Having the necessary tools readily available will streamline the replacement process. Typically, the following items are required:
- Adjustable wrench: For loosening and tightening connections.
- Basin wrench: For accessing difficult-to-reach nuts under the sink.
- Channel-type pliers: For gripping and turning various components.
- Teflon tape: For sealing threaded connections.
- Bucket or towels: For catching any residual water.
- Replacement sprayer: Ensure compatibility with the existing faucet.
Turning Off the Water Supply
Before working on any plumbing fixtures, it's crucial to turn off the water supply. This prevents accidental flooding and ensures a safe working environment. Locate the shut-off valves under the sink, typically labeled "hot" and "cold." Turn both valves clockwise until they are fully closed.
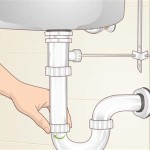
Disconnecting the Old Sprayer Hose
The process for disconnecting the old sprayer hose varies depending on the sprayer type.
- Pull-down/Pull-out sprayers: Disconnect the hose from the faucet body under the sink. This typically involves unscrewing a coupling nut using an adjustable or basin wrench.
- Side sprayers: Disconnect the hose from the faucet body using a similar method, or by disconnecting the supply line running to the sprayer.
Removing the Old Sprayer Head
Once the hose is disconnected, the old sprayer head can be removed. This may involve unscrewing the head from the hose or pressing a quick-release button, depending on the model.
Installing the New Sprayer Hose
The new sprayer hose should be installed following the reverse steps of the removal process. Ensure all connections are secure and properly sealed with Teflon tape to prevent leaks.
- Apply Teflon tape: Wrap the threads of the male connector with Teflon tape in a clockwise direction.
- Connect the hose: Thread the new sprayer hose onto the faucet body and tighten securely with an adjustable or basin wrench.
- Connect the sprayer head: Attach the new sprayer head to the hose by screwing it on or using the quick-release mechanism.
Testing for Leaks
After installation, turn the water supply back on slowly. Check all connections for leaks, including the hose connection to the faucet and the sprayer head itself. If any leaks are detected, tighten the connections or reapply Teflon tape as needed.
- Turn on the water: Slowly turn the shut-off valves counterclockwise to restore the water supply.
- Inspect for leaks: Carefully check all connections for any signs of dripping water.
- Test the sprayer: Turn on the faucet and test the sprayer functionality, ensuring proper water flow and pressure.
Addressing Common Issues
Sometimes, even after replacing the sprayer, issues can persist. Here are a few common problems and their solutions:
- Low water pressure: Check for clogs in the sprayer head or hose. Mineral deposits can often restrict water flow.
- Leaking connections: Ensure all connections are tight and properly sealed with Teflon tape. If leaks persist, the hose or faucet components may need replacing.
- Sprayer not retracting properly: Check the weight attached to the pull-down/pull-out hose. It might be damaged or improperly installed. Adjust or replace the weight as needed.
Replacing a kitchen sink sprayer is generally a manageable DIY project. By following these steps and addressing any potential issues, homeowners can restore the full functionality of their kitchen sink and avoid the expense of calling a plumber. Always consult the manufacturer's instructions for specific guidance related to your particular faucet and sprayer model.

How To Change A Kitchen Sink Spray

How To Replace A Sink Sprayer The Home

How To Replace A Sink Sprayer The Home

How To Replace Your Pull Out Sink Sprayer But Not The Hose Youtube

How To Fix A Sink Sprayer Leaking In The Kitchen Full Guide

How To Replace A Broken Kitchen Sink Sprayer Exquisitely Unremarkable

How To Replace A Delta Classic Kitchen Sink Spray Hose In 3 Minutes Easy Diy

How Do I Remove Kitchen Sink Sprayer Hose Home Improvement Stack Exchange

How To Replace A Kitchen Sink Sprayer Faucet Attachment

How To Replace A Sink Sprayer The Home