Plumbing a Bathroom Sink Drain: A Step-by-Step Guide
The bathroom sink drain is a critical component of any bathroom, responsible for efficiently removing wastewater and preventing clogs. Plumbing a bathroom sink drain may seem like a daunting task, but with the right tools and knowledge, it's a manageable DIY project. This article provides a step-by-step guide to plumbing a bathroom sink drain, covering the essential steps and considerations.
1. Gathering the Necessary Tools and Materials
Before you begin, gather all the necessary tools and materials. These include:
- Slip-joint pliers
- Adjustable wrench
- Channel-lock pliers
- Plumber's putty
- Teflon tape
- Level
- Pipe cutter or hacksaw
- Screwdriver
- Safety glasses
- Work gloves
- New sink drain assembly: This includes the tailpiece, drain stopper, and mounting nuts. Refer to your sink's installation instructions for specific requirements.
- PVC pipe (if necessary): If the existing drain pipe needs to be extended or replaced.
- PVC cement (if necessary): For bonding PVC pipe sections.
Ensure you have all the necessary tools and materials before starting the plumbing process. This will prevent interruptions and ensure a smooth workflow.
2. Disconnecting the Old Drain Assembly
The first step is to disconnect the old drain assembly. Follow these steps:
- Turn off the water supply to the sink. This is usually done by turning the valve located beneath the sink.
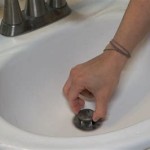
- Remove the drain stopper. If it's a pop-up stopper, use a screwdriver to remove the knob or lever. If it's a lift-and-turn stopper, simply lift it up and twist it counter-clockwise to remove it.
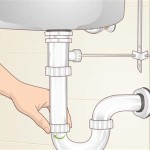
- Use slip-joint pliers to loosen the nut connecting the tailpiece to the drain pipe. Once loosened, remove the entire tailpiece assembly.
- Loosen the mounting nuts that secure the sink to the countertop. If the nuts are hard to reach, use an adjustable wrench or channel-lock pliers to grip them.
- Remove the sink from the countertop. Be careful not to damage the sink or the countertop.
- Inspect the old drain assembly for any signs of damage or wear. Replace worn-out parts, such as the tailpiece, drain stopper, or mounting nuts.
By carefully disconnecting the old drain assembly, you create a clean canvas for installing the new one.
3. Installing the New Drain Assembly
With the old drain assembly removed, you can now install the new one. Follow these steps:
- Wrap Teflon tape around the threads of the new tailpiece. This will prevent leaks and ensure a secure connection.
- Screw the tailpiece into the drain pipe. Tighten it securely using an adjustable wrench.
- Apply plumber's putty around the base of the sink drain assembly. Make sure to distribute the putty evenly to ensure a watertight seal.
- Place the sink back onto the countertop and align the drain assembly with the opening in the countertop. Make sure the sink is level before securing it.
- Tighten the mounting nuts to secure the sink to the countertop. Use an adjustable wrench to tighten them evenly.
- Install the drain stopper. Follow the manufacturer's instructions for the specific type of drain stopper.
- Turn the water supply back on and test for leaks. Check all connections carefully for any signs of leaks. If you find any leaks, tighten the connections or reapply plumber's putty.
Installing the new drain assembly is a simple and straightforward process that requires careful attention to detail. Ensure a tight seal and level installation for optimal performance.
4. Troubleshooting and Maintenance
While following the instructions carefully minimizes the risk of problems, troubleshooting and maintenance are crucial to ensure the bathroom sink drain functions optimally. Some common problems include:
- Leaks: Leaks can occur due to loose connections, worn-out seals, or cracks in the pipes. Tighten connections, replace seals, or repair cracks as needed.
- Clogs: Clogs can happen when hair, soap scum, or other debris accumulate in the drain. Use a drain snake or plunger to remove clogs. To prevent clogs, install a drain strainer over the drain opening to trap debris.
- Slow Drainage: Slow drainage can be caused by partial clogs or a buildup of mineral deposits in the pipes. Use a drain cleaner to remove mineral deposits. For stubborn clogs, consider calling a professional plumber.
Regular maintenance, such as cleaning the drain strainer and using drain cleaner periodically, can prevent clogs and extend the lifespan of your sink drain.
Plumbing a bathroom sink drain is a common DIY project that can save you money and enhance your bathroom's functionality. By following these steps and tips, you can ensure a proper installation and maintain your sink drain efficiently. Remember to always prioritize safety, and if you feel uncertain, consult with a professional plumber for guidance.

How To Plumb A Bathroom With Multiple Plumbing Diagrams Hammerpedia

Bathroom Sink Plumbing

How To Install Bathroom Sink Drain Queen Bee Of Honey Dos

Bathroom Sink Drains Plumbing Replace

Plumbing Repairs How To Repair Fix It Diy Install Bathroom Sink

How To Connect A Bathroom Sink Drain Youtube

What Is The Bathroom Sink Plumbing Rough In Heights

How To Easily Connect The Plumbing For A New Bathroom Sink Hometips

How To Plumb A Drain Sink Pipes Youtube

What Plumbing Piece Is Normally Used To Transition From 1 4 Bathroom Sink 2 Drain Pipe Quora