How to Install Under the Sink Water Filter
Installing an under-the-sink water filter is a great way to improve the quality of your drinking water. Under-the-sink water filters remove contaminants such as lead, chlorine, and bacteria from your water, leaving you with clean, healthy water. Installing an under-the-sink water filter is a relatively simple process that can be completed in a few hours.
Materials Needed
* Under-the-sink water filter * Adjustable wrench * Plumber's tape * Scissors * Measuring tapeStep 1: Choose a Location
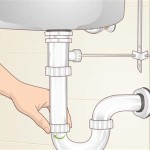
The first step is to choose a location for your under-the-sink water filter. The filter should be installed under the sink, close to the cold water supply line. Make sure there is enough space under the sink to accommodate the filter.
Step 2: Turn Off the Water Supply
Once you have chosen a location for your filter, turn off the water supply to your sink. You can do this by turning off the valve under the sink or by turning off the main water supply to your home.
Step 3: Remove the Old Filter (if applicable)
If you are replacing an old under-the-sink water filter, remove the old filter by unscrewing the filter housing. Be sure to catch any water that may leak out of the filter housing.
Step 4: Connect the Filter Housing to the Water Supply Line
Wrap the threads of the filter housing with plumber's tape. Then, screw the filter housing onto the cold water supply line. Tighten the filter housing until it is snug.
Step 5: Install the Filter Cartridge
Remove the filter cartridge from its packaging and insert it into the filter housing. Make sure that the filter cartridge is properly seated in the filter housing.
Step 6: Tighten the Filter Housing
Tighten the filter housing until it is snug. Be sure not to overtighten the filter housing, as this could damage the filter.
Step 7: Turn on the Water Supply
Turn on the water supply to your sink. Check for leaks around the filter housing. If you find any leaks, tighten the filter housing until the leaks stop.
Step 8: Flush the Filter
Run water through the filter for a few minutes to flush out any loose activated carbon particles. The water may be discolored at first, but it will clear up after a few minutes.
Step 9: Enjoy Clean, Filtered Water
Once the filter has been flushed, you can start enjoying clean, filtered water. The filter will remove contaminants such as lead, chlorine, and bacteria from your water, leaving you with clean, healthy water.
Tips
* Replace your under-the-sink water filter every 6 months to ensure that it is working properly. * If you have any questions about installing or using an under-the-sink water filter, consult with a qualified plumber. * Under-the-sink water filters are a great way to improve the quality of your drinking water. By following these simple steps, you can install an under-the-sink water filter in your home and enjoy clean, healthy water for years to come.
How To Fit And Under Sink Water Filtration System

How To Install A Water Filter Under The Sink Home

How Undersink Water Filters Work

Puredrop Pdr 16kuf2 0 01 μm Ultra Filtration Under Sink Water Filter High Capacity 2 Stage System Chlorine Bad Taste And Odor The Home

Faucet How To Convert An Undersink Filter System Above Sink Home Improvement Stack Exchange

How To Install An Under Sink Water Filtration System

How To Install An Under The Sink Water Filter System

Under Sink Water Filter System Install Guide

How To Install An Undersink Water Filtration System Whirlpool

How To Install A Triple Under Sink Water Filter