How to Change a Sink Faucet
Whether it's due to a leak, a desire for a different look, or a malfunction, replacing a sink faucet is a relatively straightforward task that can be completed with a few basic tools and a little know-how. Here is a step-by-step guide to changing a sink faucet:
1. Gather Your Tools and MaterialsBefore you start, gather the necessary tools and materials. You will need:
* A new sink faucet * A basin wrench or adjustable wrench * Two slip-joint pliers * A bucket * A flashlight (optional) * Plumber's putty (optional) 2. Turn Off the Water SupplyLocate the shut-off valves under the sink. These valves are typically located near the base of the faucet. Turn the handles clockwise to close the valves and stop the water flow.
3. Disconnect the Water LinesUse the basin wrench or adjustable wrench to loosen the nuts that hold the water lines to the faucet. Be careful not to overtighten the nuts, as this can damage the lines. Once the nuts are loose, detach the water lines from the faucet.
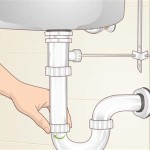
4. Remove the Old FaucetUse the slip-joint pliers to loosen the nuts that hold the faucet to the sink. There are typically two nuts, one on each side of the faucet. Once the nuts are loose, lift the faucet up and off the sink.
5. Clean the Sink SurfaceRemove any old plumber's putty or debris from the sink surface where the new faucet will be installed.
6. Apply Plumber's Putty (Optional)If desired, apply a thin bead of plumber's putty around the base of the new faucet. This will help to create a watertight seal.
7. Install the New FaucetPlace the new faucet on the sink and align the holes. Use the slip-joint pliers to tighten the nuts that hold the faucet to the sink. Be sure to tighten the nuts securely, but do not overtighten.
8. Reconnect the Water LinesConnect the water lines to the new faucet. Use the basin wrench or adjustable wrench to tighten the nuts that hold the lines to the faucet.
9. Turn on the Water SupplySlowly turn on the shut-off valves under the sink to allow water to flow into the faucet. Check for leaks.
10. Adjust the FaucetUse the handles on the faucet to adjust the water temperature and flow rate. Tighten the handles securely.
11. Optional: Install a BacksplashIf desired, install a backsplash behind the faucet to protect the wall from splashes.

How To Replace A Kitchen Sink Faucet Youtube

Diy How To Replace And Install A Bathroom Sink Faucet

How To Replace A Kitchen Faucet

How To Change A Kitchen Faucet Family Handyman

Handyman Services Sink Faucet Replacement

How To Replace A Bathroom Sink Faucet

How To Replace A Kitchen Faucet For Newbies Anika S Diy Life

Diy How To Replace A Bathroom Sink Faucet Remove Install

How To Replace A Kitchen Faucet Young House Love

How To Replace A Bathroom Faucet Removal And Installation