Installing Bathroom Sink Drain Plumbing
Installing the drain plumbing for a bathroom sink is a relatively simple task that can be completed in a few hours. By following these step-by-step instructions, you can ensure that your sink drain is properly installed and functioning correctly.
Step 1: Gather Your Tools and Materials
Before you begin, you will need to gather the following tools and materials:
- Adjustable wrench
- Pliers
- Bucket
- Plumber's putty
- Teflon tape
- Drain assembly
- Pop-up drain stopper (optional)
Step 2: Remove the Old Drain Assembly
If you are replacing an existing drain assembly, you will need to first remove the old one. To do this, place the bucket under the sink to catch any water that may spill out. Use the adjustable wrench to loosen the slip nut that is holding the drain assembly in place. Once the slip nut is loose, you can pull the drain assembly out of the sink.
Step 3: Apply Plumber's Putty
Before installing the new drain assembly, you will need to apply a ring of plumber's putty around the base of the drain flange. The plumber's putty will help to create a watertight seal between the drain flange and the sink.
Step 4: Install the Drain Assembly
Place the drain assembly into the sinkhole. Use the adjustable wrench to tighten the slip nut until it is snug. Do not overtighten the slip nut, as this could damage the drain assembly.
Step 5: Install the Pop-Up Drain Stopper (Optional)
If you are installing a pop-up drain stopper, you will need to do so now. To install the pop-up drain stopper, insert the stopper into the drain assembly. Then, use the pliers to tighten the set screw that is located on the side of the stopper.
Step 6: Test the Drain
Once the drain assembly is installed, you should test it to make sure that it is working properly. To do this, turn on the water and let it run into the sink. The water should drain out of the sink smoothly and without any leaks.
Step 7: Apply Teflon Tape
Wrap the threads of the drain pipe with Teflon tape. The Teflon tape will help to create a watertight seal between the drain pipe and the trap.
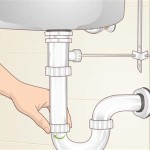
Step 8: Install the Drain Pipe
Connect the drain pipe to the drain assembly. Use the adjustable wrench to tighten the connection until it is snug. Do not overtighten the connection, as this could damage the drain pipe or the drain assembly.
Step 9: Install the Trap
Connect the trap to the drain pipe. The trap is a U-shaped pipe that helps to prevent sewer gases from entering the bathroom. Use the adjustable wrench to tighten the connections until they are snug. Do not overtighten the connections, as this could damage the trap or the drain pipe.
Step 10: Test the Drain Again
Once the drain is installed, you should test it again to make sure that it is working properly. To do this, turn on the water and let it run into the sink. The water should drain out of the sink smoothly and without any leaks.
Congratulations! You have now successfully installed the drain plumbing for your bathroom sink.

How To Install Bathroom Sink Drain Queen Bee Of Honey Dos

How To Install A Pipe From Sink Drain Wall Ehow

How To Connect A Bathroom Sink Drain Youtube

Installing A Bathroom Sink Drain Body Efficient Plumber

How To Install Bathroom Sink Drain Queen Bee Of Honey Dos

How To Easily Connect The Plumbing For A New Bathroom Sink Hometips

Bathroom Sink Plumbing Installation Diy Montreal

How To Install P Trap And Bathroom Sink Drain Piping Easy Installation For Beginners Youtube

How To Install Bathroom Sink Drain Queen Bee Of Honey Dos

How To Fit A Bathroom Sink Diy Guides Victorian Plumbing